- Wellth Coaching
- Posts
- Neck and Upper Back Desk Fix Protocol
Neck and Upper Back Desk Fix Protocol
Tactical steps to assess and then unlock your neck and upper back
Nolan Cunningham
March 06, 2025

Table of Contents:
Disclaimer:
If a physician, physical therapist, or another board certified clinician has cautioned you against specific movements or exercises for these body parts - do not perform the below protocol without first communicating with that respective clinician and asking for their specific advice on the matter. The below is meant to provide screening and preventative exercises for someone who believes they may have tension or tightness in the below mentioned body parts. The below is NOT meant to replace any medical advice. Please consult with your physician before taking on any physical activity that may pose a risk to your health.
Step 1: Range of Motion Initial Screen
Neck
Neck Flexion and Extension
Starting in a sitting position, nod the head up and down. Demo here.
Don’t change the angle of your torso at all. Isolate this only to the neck. Sitting with your back against a flat surface or chair helps you avoid inadvertently “cheating”
At any point do you feel tightness or pulling? If so, don’t over-flex or over-extend. Having tightness prior to the nose pointing to the sky or prior to your chin touching your collarbone is a good indication of limited range of motion.
If you’re not yet used to feeling out exactly where your range of motion limits are per se, use a mirror or video yourself so you have a reference point of how far your head can nod.
Neck Side to Side Rotation
Starting in a sitting position, rotate your head left and right. Demo here.
Don’t rotate at the shoulders at all. Isolate this only to the neck. Sitting with your back against a flat surface or chair helps you avoid inadvertently “cheating”
At any point do you feel tightness or pulling? If so, don’t over-rotate. If there is tightness prior to looking past your shoulder, this area is likely in need of some work.
If you’re not yet used to feeling out exactly where your range of motion limits are per se, use a mirror or video yourself so you have a reference point of how far your head can rotate.
Neck Lateral Bending
Starting in a sitting position, tilt your head to one side, then the other. Think about sending your ear to your shoulder. Demo here.
Sitting on your hands or grabbing the edge of a chair helps you avoid inadvertently “cheating” by tilting your whole torso. We want to isolate this JUST to the neck.
At any point do you feel tightness or pulling? If so, don’t over-bend. If there is tightness prior to getting your ear halfway to your shoulder, this area is likely in need of some work.
If you’re not yet used to feeling out exactly where your range of motion limits are per se, use a mirror or video yourself so you have a reference point of how far your head can tilt.
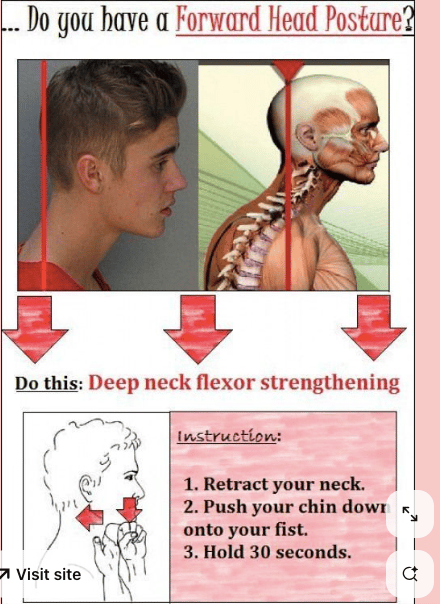
Cervical Spine Posture (Tech Neck)
Retract and protract your head FORWARD AND BACK. Demo here. Yes, that’s a pigeon video.
Do you have the ability to move the head forward and back at all, or are you completely locked up? If you can protract and retract your head, how far can you go?
If you’re not yet used to feeling out exactly where your range of motion limits are per se, use a mirror or video yourself so you have a reference point of how far your head can retract and protract (retraction is typically much more difficult for folks).
Another good way to visualize this is the protraction shown via Justin Bieber’s mugshot 🙂
The first diagram shows the PROTRACTION - when we want to push our head OUT. Then, to reverse it, push your head BACK by retracting your chin IN.
The second diagram shows a neutral neck and then an extreme version of the retraction. Notice how in the photo on the right, the vertebrae of the spine furthest down in the frame are stacking on one another.
Source: some rando on Pinterest
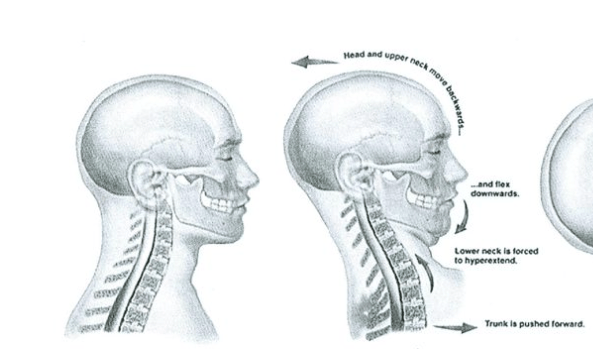
Source: corehealthcare.com.au
Upper Back
Shoulder Rolls
Keeping the torso perfectly still, move the shoulders forward and around the socket. Demo here.
I like thinking about looking at my torso from a side view. In this view, the insertion point of my arms into my shoulders would be the gold-colored bolts in the below gif. I think about moving the insertion point of my arm AROUND the shoulder socket to test how wide of a circle I can make.
Can you make only really tiny circles or much larger circles?
If you’re not yet used to feeling out exactly where your range of motion limits are per se, use a mirror or video yourself so you have a reference point of how wide of a circle you can make.
Shoulder Shrugs
Starting in a sitting position and keeping your torso perfectly still, move your shoulders UP and DOWN, shrugging your shoulders toward your earlobes and back down. Demo here.
Add a 45# plate (or more if you need) onto your lap and do these sitting to avoid inadvertently “cheating” by lifting your whole torso or sitting up higher in your seat. We want to isolate this JUST to the shoulders.
Can you lift and lower at all, a little bit, or a lot? Test how far UP AND DOWN you can pull and push your shoulders. Can you get the shoulders far away from your ears? Can you get them really close to your ear lobes?
If you’re not yet used to feeling out exactly where your range of motion limits are per se, use a mirror or video yourself so you have a reference point of how much distance your shoulders can travel up and down in the shrug.
“Thumb Test” in Upper Trap
At the vey top of the trap it can feel like a string of tissue. This video is kind of weird ngl and is low quality but it gets the job done. Demo here.
Find that tissue that runs from the top of the shoulder to its insertion point in the neck. It’s the “hypotenuse side” on the upper trapezius triangle, where the green dots are in the below image. Put your index finder on one side of the tissue and your thumb on the other side, squeezing together.
Is this tissue tight? Do you have discomfort as you squeeze with only moderate pressure? If it is as tight as a piano string, it could use work. If on the other hand it is loose and pliable, without discomfort when you squeeze moderately-to-aggressively, then this section isn’t as tight.

Source: mdpi.com
“Lax Ball Test” In Crest of Back
This area is the middle trap. Lie down on the ground with a la crosse ball on your middle trap. See if you can “melt” into the ball at all. Demo here. Demo shows a little bit of the upper trap as well as the middle trap, but you get the point.
How comfortable / uncomfortable does this feel? If it feels like you’re rolling around on a marble, your middle trap is pretty darn tight. If on the other hand you can breathe deeply and your muscles envelope the la crosse ball (it’ll feel like melting into the ball), your middle traps are more pliable and less tight.
The more discomfort you have, the more you likely need to work on this. This is one of the exercises where the test is the same as the intervention.
See the below image, in the MIDDLE picture, for a reference of where to put the la crosse ball.

Scapular Push-ups
Moving into the thoracic spine, next is the Scapular region. The scapula is the shoulder blade, but the musculature in-between and on top of the shoulder blades are the Rhomboid and the lower trap, respectively.
Start in a hand plank (I like going from my knees - NOT toes - as I feel like I have a more localized and focused test that way). Squeeze your glutes, quads, and abs to isolate the movement more. Keeping your elbows locked, bring your shoulder blades as close together as you can and then spread them apart as far as you can. Think about crushing an aluminum can with your shoulder blades and then driving the VERY MIDDLE of your back as high as you can toward the sky, back and forth back and forth. Demo here.
Can you get a lot of movement up and down as the shoulder blades protract and retract? Or do you feel gummed up without a lot of movement?
If you’re not yet used to feeling out exactly where your range of motion limits are per se, use a mirror or video yourself so you have a reference point of how much distance your upper back can retract and protract (i.e. how much can your torso travel up and down WITHOUT help from the elbows and without bending in the spine?).
Thread the Needle
Starting in a tabletop (quadruped) position, rotate one arm to the sky while looking at that hand, then reverse direction and send that same arm behind the planted arm. End with the back of the working arm resting fully on the ground, palm up. The back of the shoulder, the tricep, the forearm, and the back of hand should all be on the ground.
I prefer to send the hand not directly perpendicular to the orientation of the planted hand’s fingers, but more up at a 45-degree angle while sitting my hips back toward my heels. Demo here.
Can you get your full back of your arm against the ground comfortably while sitting back onto your heels? Can you sink deeper into the rear deltoid stretch by rotating your torso toward the opposite side as your out-stretched palm? If no, this is probably tight.
If you’re not yet used to feeling out exactly where your range of motion limits are per se, use a mirror or video yourself so you have a reference point of how much distance there is between the back of your shoulder and the ground.
It’s important to note that our bodies are systems that are interconnected by two-way streets. This post refers to only two muscle groups, but adjacent and even peripheral muscle groups like the lower legs and upper arms are impacted by (AND HAVE AN IMPACT ON) the muscle groups mentioned here. They’re all connected, either directly or more indirectly. So the inclusion of the Deltoid (back of the shoulder) here with Thread the Needle at the end is more of a single example of all the other potentially influenced / influencing muscle groups and soft tissue impacted by (and impacting) the upper back and neck. Shoulders and lumbar spine would be at the top of the list in my opinion for upper back and neck complaints.
Step 2: Intervention
Now that we know which areas are gummed up / tight / stuck together - we can do something about it.
Part A: Warm It Up
The first part of intervention is always going to be to warm up the body and the local area. One of the best ways in my opinion to warm up the area is working out - specifically light movement in the area like one would typically do in a group class warm up BUT ALSO getting the core body temperature up and getting a little glean of sweat going.
Other ways to warm up include Swedish self-massage (light pressure with warm hands), a hot compress, hot tub, sauna, or heated blankets.
Warming up the soft tissue makes it open and more receptive to change (by making it more malleable).
Part B: Release
The second part of intervention is the myofascial and muscular release. Once the tissue is warm and receptive to change, we induce a change through deep tissue work and massage.
Here are some recommendations for each area we talked about above in the Range of Motion INITIAL Screen. You can hit literally all of these areas with a massage gun, too. I don’t mention that repeatable but heads up it’s a super versatile tool.
Neck
Neck Flexion and Extension, Neck Side to Side Rotation, Neck Lateral Bending
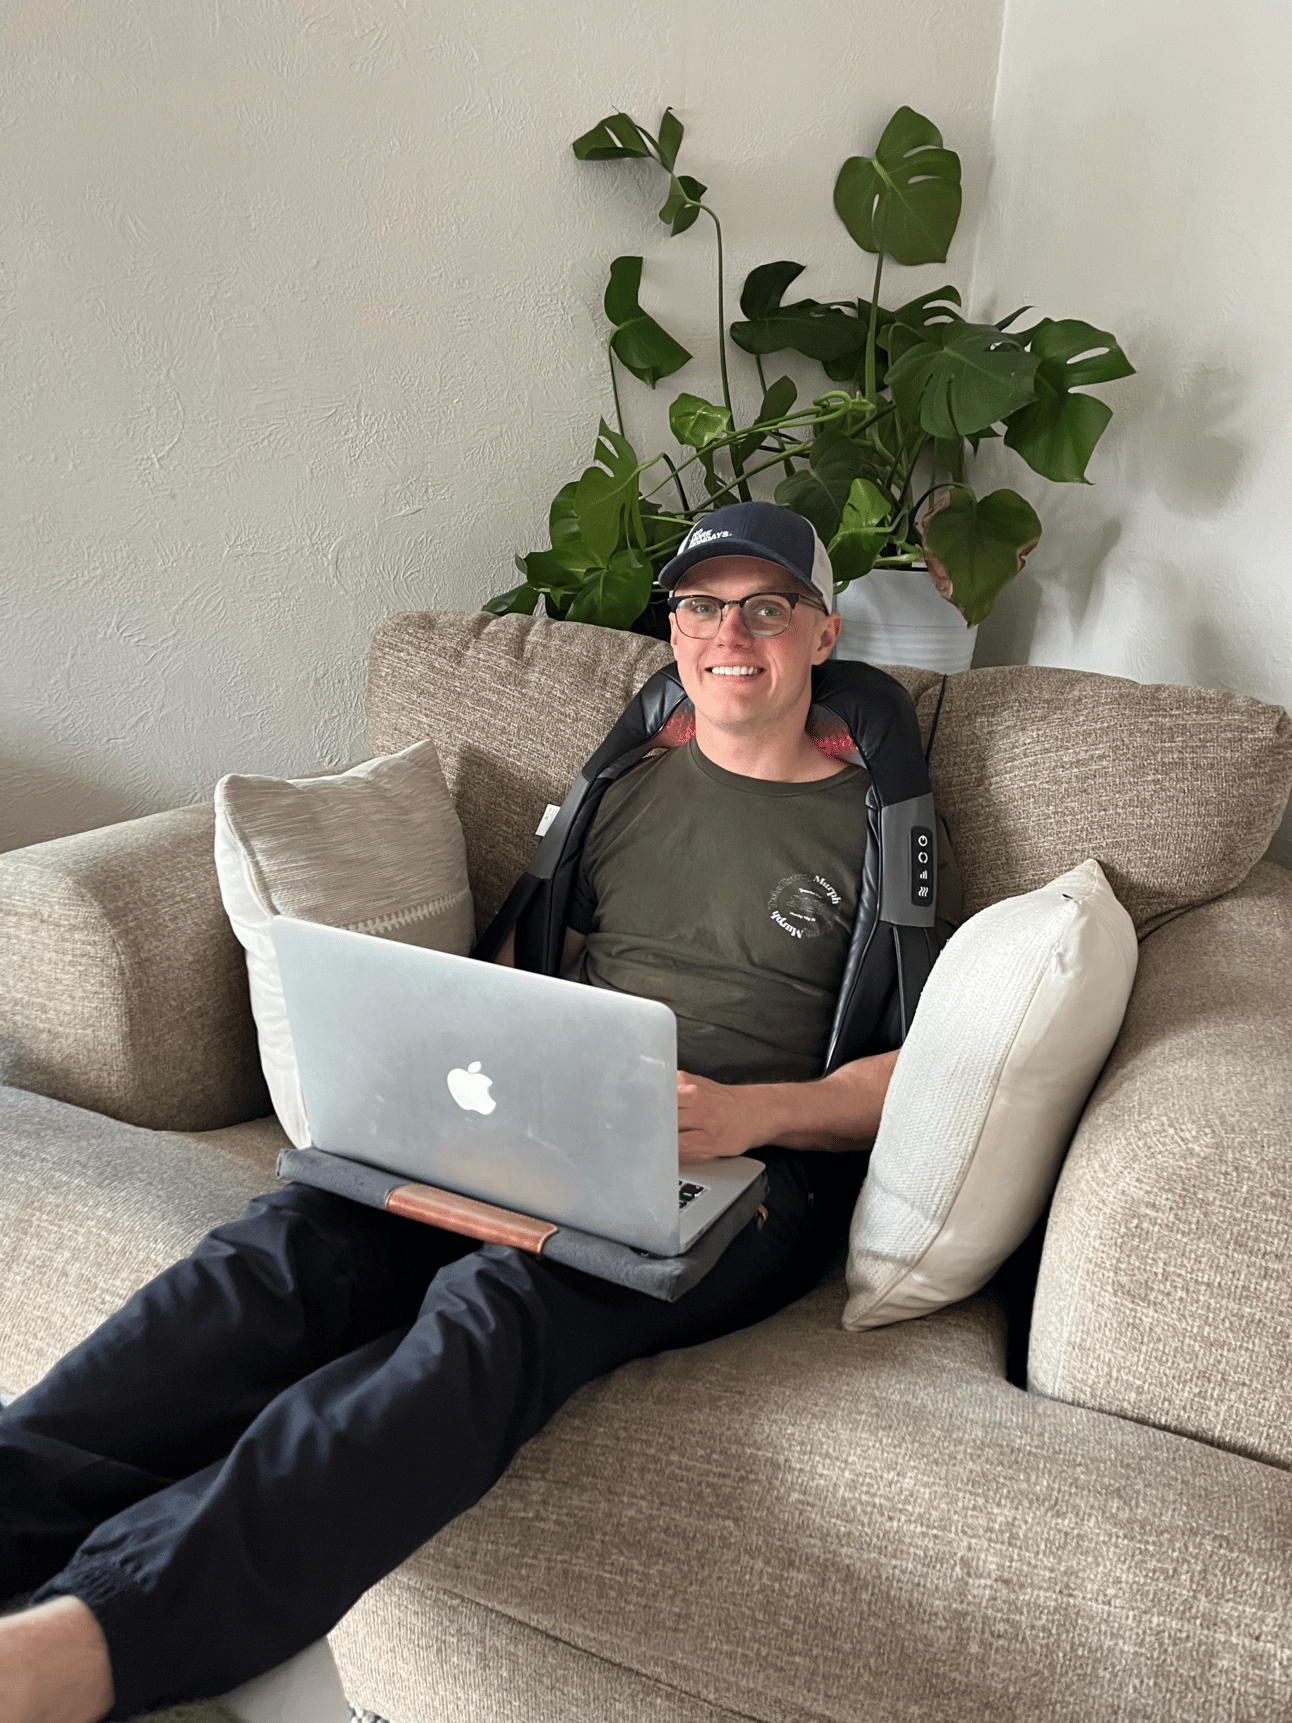
For all of these areas, I like using a neck massager. Bonus points for anyone who can work off camera, in a private office, or remotely at home - you can use it while you work!
Cervical Spine Posture (Tech Neck)
For this area I like rolling / tilting movements and compression.
I’ll compress the base of my skull and upper neck with the Deneroll, a la crosse ball, or (yes truly) a massage gun on high. These are things that I do based on a recommendation from my chiropractor / physiotherapist to me 5 years ago. Your Mileage May Vary and with neck stuff you gotta be careful. I’m just sharing what’s worked for me.
I also like rolling / tilting motions personally for a less intense “warm-up” before the compression and deep tissue work. Seated 360-degree Neck Rolls, Seated 45 Neck Tilts, and Seated Neck Rotations with a Tilt are some favorites for me. Note the last two have retraction in them, too.
Upper Back
Shoulder Rolls / Shoulder Shrugs / "Thumb Test" in Upper Trap
I’ll categorize all of these as Upper Trap for simplicity’s sake.
The “Thumb Test” - this one was a test mentioned above, but it is also a good intervention in addition to being a good test.
LAX Ball Smash Traps - unweighted or lateral rolling are both good stepping stones to the next intensity level. Make less intense by doing it against the wall instead of on the ground.
LAX Ball Smash Traps - weighted or feet elevated are two ways to make this one more spicy to get deeper into the tissue. That above linked feet elevated video is on the lumbar, not traps, but you get the point.
Barbell Smash Traps - Here’s a demo video. Take the barbell and place it on the upper trap as if you were holding a bazooka.
Roll the bar laterally up and down your trap, finding different angles for your neck to further deepen the pressure from the barbell (tilt your neck away from the bar).
Additionally, you can keep the barbell in one spot on your trap and add movement by flexing and extending your arm vertically at the shoulder.
To make less intense, place one end of the barbell on a static object like a rolling rack of plates.
To make more intense, add more weight behind you (e.g., the majority of the barbell length is hanging off the back of your body behind your shoulder)
The most intense variation is where the collar of the barbell is on your trap, not just the bar itself. The collar is the thickest part of the barbell that the plates bump up against.
This is by far my favorite myofascial release exercise. Some of you might recognize it from the book Becoming a Supple Leopard.
"Lax Ball Test" In Crest of Back / Scapular Push-ups
You can hit the Mid Traps in a variety of ways, including with a foam roller, a peanut (aka double la crosse ball), or a single la crosse ball, among others.
LAX Ball Smash T-spine - unweighted is less intense, weighted is more intense. You do the weighted variation by adding weight on your chest (like a DB). Pretend the la crosse ball is a search and rescue team, and your mid-back is the terrain it is covering. Seek out every nook and cranny of tissue (not bone) that is tight, move the la crosse ball there, and breathe deeply for 1.5-2 minutes in that spot (or as long as it takes for the muscle and tissue to relax).
Start with the la crosse ball in the middle of your upper back (thoracic spine). Do not place the ball directly on your spine, instead, place it just off of the middle of your spine to one side.
Work to keep your lower back on the ground as you windshield wipe your arm from your side to above your head and back down, flexing and extending at the shoulder.
The arm that is working is the arm on the same side as where you placed the ball in relation to the spine.
Breathe deeply into the la crosse ball to allow the muscle to relax and the tension to release.
You can make even less intense by doing this against a wall instead of on the ground.
Thread the Needle
Targeting the rear deltoid and outside cap of the shoulder is tough, but not impossible.
Trying to reach this area with a la crosse ball is easiest when one shoulder is up on the ball and the other is on the ground. It’s wonky and I don’t love how my shoulders are not square with my hips, but it can be workable.
In addition, I’ve found a lot of success with using a massage gun. Lying down face down I’ll hit the back of my shoulder with my opposite hand.
Lastly, using a foam roller on your upper back as well as hitting each side individually by pitching your chest and crossing your arms is another good technique. Use a RumbleRoller for extra stimulus.
Part C: Static Holds
The static stretches run the gamut and I’m sure you’re familiar with a bunch of them. Hold each pose 3X for 15+ seconds each. These holds will lock-in the gains that you made when you warmed up the tissue and then “worked it.”
Neck
For the neck, perform with long, static holds, the following:
The flex and extend, rotate, lateral bend from the “Range of Motion: Initial Screen” section and
The Tilts from the “Release” section.
Upper Back
For the upper back, perform, with long, static holds, the following:
Heavy Double DB / Double KB Farmer’s Carry Hold (aka Suitcase Hold)
Barbell Trap Smash with Neck Tilt, long static hold in neck tilt at slightly different angles
Cat/Cow with long, extended holds in both positions
Prayer Stretch (on Elbows) - I like putting my elbows on the foam wrist rest in front of my keyboard at my standing desk. It’s the perfect height and is cushioned. Extra credit if you use a PVC and widen your hands / curl the PVC towards you between each static hold.
Hugging Stretch - Cross both arms over your chest and place your hands behind the shoulders of your opposite arms. Bring your elbows closer together in front of your body and raise your elbows. The more you raise your elbows the deeper this stretch will get.
Thread the Needle - another one where the test and the intervention (this time the stretch) is the same. Here’s the original. I like the Child’s Pose variation because it gets deeper.
Step 3: Retest!
Just re-run through the original assessments for the body part in question, take note of any differences, and if you feel comfortable doing so - verbalize out loud the before and after. This will help your proprioception for next time when you feel like you might be tight. Bringing awareness to the difference between current state and optimal state is super beneficial for knowing where on the tightness spectrum your tissue is currently at!
Hope this helps
Yours in Health,
Nolan
Table of Contents:
Legal stuff:
Participation in General Physical Preparedness exercises and related activities conducted - either in the spirit or letter of the programming in these posts - involves certain risks and potential dangers. We, our employees, representatives, affiliates, and agents are not to be held responsible for any claims, demands, liabilities, rights, damages, expenses, and causes of action of any nature arising out of or in connection with participation in the programming of these posts
Reply